

Friday, 5 November 2010

How To Bypass Firewall Using Tool

Is Orkut, Facebook,Yahoo blocked on your school, college or office? Then, don't worry. I have a solution for you that will not only unblock all the websites that have been blocked but also make your internet surfing anonymous so that nobody can trace your orignal ip address. As you know that most of the proxy websites are blocked with your school, college or office firewall and even if you find some new proxies they even them block them out. So,why not to move something that is almost a permanent solution.

We will be using a very small and free software called ultrasurf. It will not only allow you to surf blocked websites but it will also give you freedom to stream videos, download and upload files.

Here is the step by step tutorial with screenshots:

1. First you need to Download Ultrasurf.

2. You will get a zipped file with a .exe file in it. Click on it

3. It will start ultra surf and automatically connect to its server.


4. Even it will open your Internet explorer automatically. Now you can have an unblocked and secure to internet.

5. If you want to use ultrasurf on Firefox, you need to download the firefox plugin too: download here

If you are connected to internet through a proxy server then ultrasurf will detect it. If somehow it does not detect the proxy server then you can manually enter your proxy server

To manually enter proxy server

Click on Option > Proxy Setting > Manual Proxy Settings


Note: If you want to use ultrasurf with other applications you need to configure them to use ultrasurf as their proxy client. The Proxy IP address is 127.0.0.1 and the Port is 9666.

Saturday, 2 October 2010

Learn Brutus Tutorial


How to use Brute Force Attack

Written by: ALEX================================================== ========
I, The alex, take no responsibilty for what you do with the information
that I am providing for you. This information is for educational purposes only.
================================================== ========

Chapter 1: Introduction to Brutus.

1.What is Brutus?

2.What can I do with it?

3 Where can I download Brutus?

4.Where can I find a good password list?


Chapter Two: Let's Get Crackin'.

1.HTTP Form.

2.FTP.

3.POP3

4.Telnet.

5.SMB (Netbios)

6.Netbus

7.Custom.

Chapter Three: Wrapping up.

1.Contact Information.
========================================
Chapter One.

==What is Brutus?==

Brutus is a well known password brute forcing program.

==What can I do with it?==

With Brutus, you can brute force passwords for HTTP, FTP, POP3, Telnet, SMB (Netbios), Netbus, and they also have a
"Custom" option so you can specify your own settings.

==Where can I download Brutus?==
You can find Brutus at it's webpage www.hoobie.net/brutus
You can also find it at GluTuk's site www.spartandownloads.2ys.com

==Where can I find a good password list to use with Brutus?==
Pretty much, the only password list you will ever need
and has 4.9 million passwords. Here are a link where you can download it.

Part 1.
http://area51archives.com/files/pass_list.rar

Part 2
http://area51archives.com/files/pass_list.rar

================================================== ============

Chapter Two: Let's Get Crackin'.

Note: You can use a proxy for each cracking method.

==HTTP Form==

This is the option you would use if you want to crack into a website that has a field for a username and a pass, like
this one.

http://www.westbranch.k12.oh.us/staff/controls.asp

I will use this site for the rest ov this section as well.

First thing you wanna do is open Brutus, and select http form. Then click the modify sequence button. Once there we put
the above link into the Target form field, then click Learn Form Settings
From here, you click the field name that is for the username, in this case it is userid, once you have selected it,
click the username button that is shown above the cookie information. That tells brutus that that field is for the username.
Then you select the password field and click the password button, then click accept. Next, in the HTML Response field you
need to fill that in with the response you get when you try to enter a password into your site. In this case the response is
"You have entered a wrong Password or username." For this target we will put that into the Primary response field Once this
is done, we click ok, add the IP into the Target Field and start our crack.

==FTP==

For cracking an FTP server, the default settings should remain how they are, I usually make sure that the "Try to stay
connected for unlimited attempts" box is ticked.Thats up to you, once you have selected your options, enter the IP and
being the crack.

==POP3==

This is pretty much the same as FTP cracking as far as, the default settings should work for you. Once again, I like to
use the "Try to stay connected for unlimited attempts" option.

==Telnet==

Seems as if I'm repeating myself, but once again, the default settings should werk for you.

==SMB (Netbios)==

If you happen to find yourself a target that has the netbios port open (139) and has sharing enabled, but needs a
password, this is what you would use. Once again, default settings should werk.

==Netbus==

Netbus is a popular trojan that sometimes, you might find a server that needs a password to connect.
This option is used for, cracking a password protected Netbus server.

==Custom==

This is what you would use to set up a crack for anything else that you could think ov.You need to find out what you need
to put in each field once you click "Define sequence" Those options will vary from target to target.

......................................................................................................................................................... ...............................................................

Thursday, 30 September 2010

Hack websites using Auto SQL Helper

I have been asked Recently to write a tutorial on how to use
"SQL I Helper V.2.7" tool.
At the beginning "SQLI HelperV.2.7" is a tool that can hack vulnerable websites using SQL injection. You don't have to spend hours and hours trying to find your way in a website and trying hundreds of combination's and codes to hack a website.
This tool will do it all by itself. You only have to tell it what to do.
You can download it from here:
Download Link: (this should link to reiluke.i.ph and nowhere else!)
http://reiluke.i.ph/blogs/reiluke/20...download-link/

And
Download Video Tutorial Here
Lets start.
First you need to find the potential website that you think it might be possible to hack it. Remember that some websites are simply unhackable.
After you find your website ( better to end with "article.php?id=[number]" ) example: "http://encycl.anthropology.ru/article.php?id=1"

I will explain my tut on how to hack this website.

Check if your website can be hacked by trying to go this address :
http://encycl.anthropology.ru/article.php?id='1 <------ notice the ' before the number 1.

you should get this message:
Code:
Query failedYou have an error in your SQL syntax; check the manual that corresponds to your MySQL server version for the right syntax to use near '\'1 ORDER BY lastname' at line 1 SELECT * FROM person_old WHERE id=\'1 ORDER BY lastname

This mean that this website can be hacked because you get an error.

Now open your SQL I Helper V.2.7
and write the link :
http://encycl.anthropology.ru/article.php?id=1 <---- without the '
here
[Image: 2n8wtow.jpg]

and press the inject button.

Now you should wait until the tool finish searching for columns . Time may vary depending on your connection speed , your pc speed , and the number of columns in the website.
So now you should have this:
[Image: 15xvl2v.jpg]

then select "Get database" and you get this:
http://i40.tinypic.com/znq9tz.jpg

Now select any element from the "database name" box and press the "Get tables" button , I will select "anthropo_encycl":
[Image:  668zs6.jpg]


then select any element from the "table name" box and press the "Get columns" button , I will select "user":
[Image: 24e3vyo.jpg]

then select any elements you want from the "columns name" box and press "Dump Now" , i will select "usr_login" and "usr_pass"
[Image: 2vb4ndj.jpg]

After clicking "Dump Now" , you should see this new window
[Image:  fxwj2p.jpg]

Now copy the hash on a peace of paper and go to this website:
http://www.md5crack.com/

enter the hash and press the button "Crack that hash baby!" and you should get the source of the hash.
hash:21232f297a57a5a743894a0e4a801fc3
username: admin

hash:202cb962ac59075b964b07152d234b70
Password: 123
.................................................................................................................................... ..................................................................................
.................................................................................................................................... .................................................................................

How to Unlock the iPhone 3G, 3GS Using BlackSn0w


These are instructions on how to unlock the iPhone 3G and 3GS using BlackSn0w. To follow these instructions you must be on the 05.11.07 baseband and have already jailbroken.

If you have not already jailbroken it will be easier to follow one of these tutorials which will walk you through both jailbreaking and unlocking.
- Windows
- Mac
To check your baseband you can follow these instructions.

Lets begin...

Watch the Video!
For your convenience this tutorial is available in video format also. Click the Watch It button to view the tutorial!


Step One
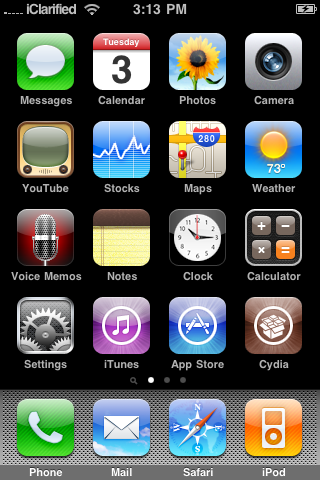
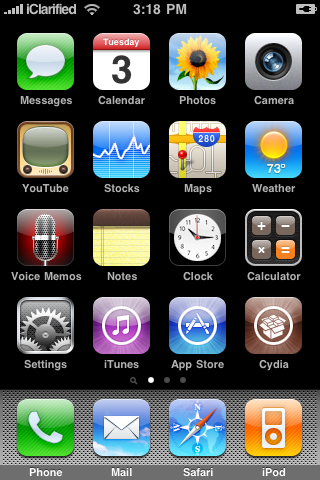
Press to launch Cydia from your iPhone Springboard.

Step Two
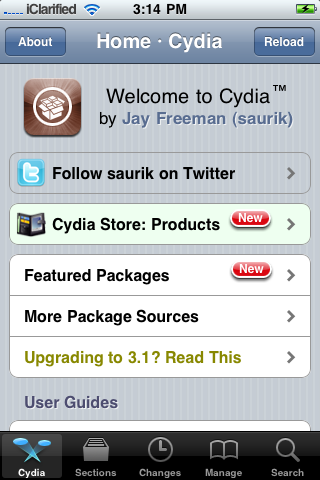
Press to select Manage from the tabs at the bottom of the screen.

Step Three
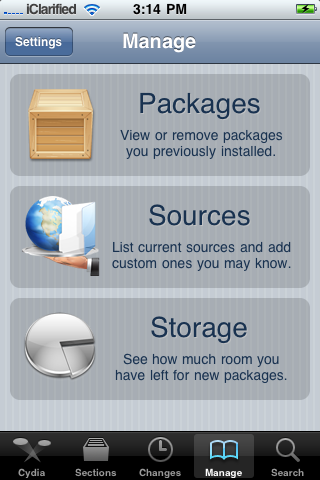
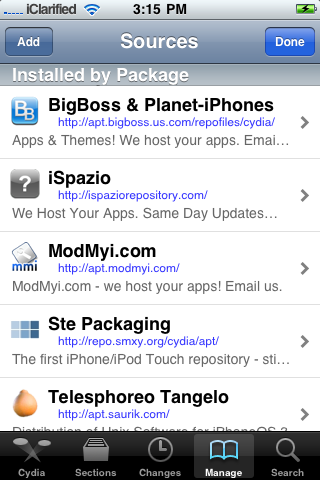
Press the large Sources button.

Step Four
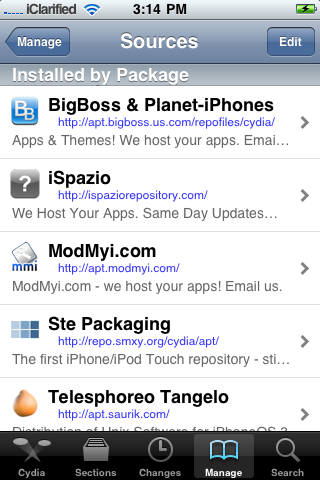
Press the Edit button at the top right of the screen.

Step Five
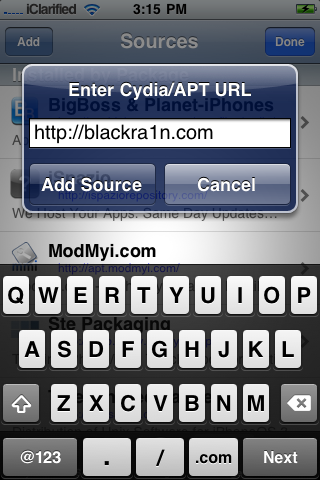
Press the Add button at the top left of the screen.

Step Six
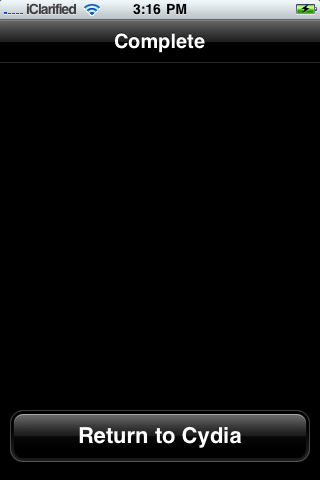
Input http://www.blackra1n.com as the source address then press the Add Source button. Once Cydia has added the source press the large Return to Cydia button.

Step Seven
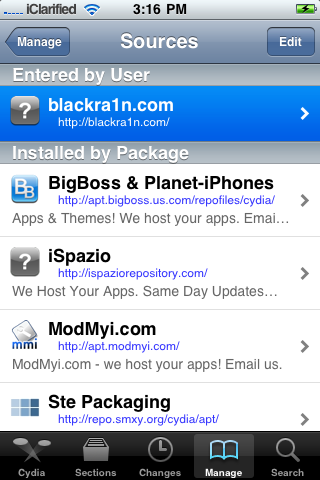
Press the Done button at the top right of the screen.

Step Eight
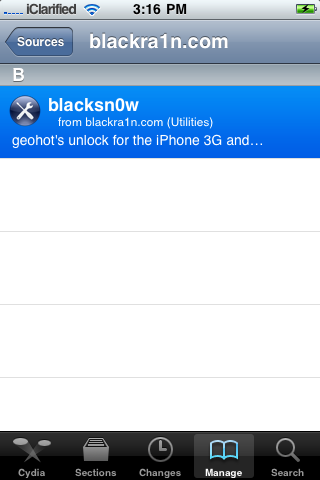
Press to select blackra1n.com from the list of sources.

Step Nine
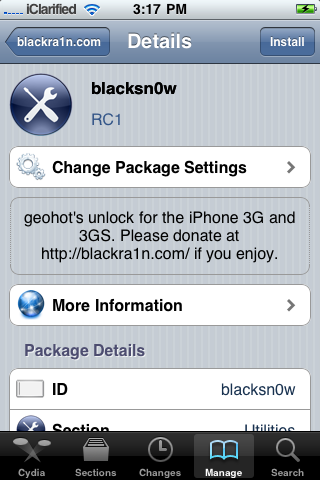
Press to select blacksn0w from the list of packages.

Step Ten
Press the Install button at the top right of the screen.

Step Eleven
Press the Confirm button at the top right to begin installation.

Step Twelve
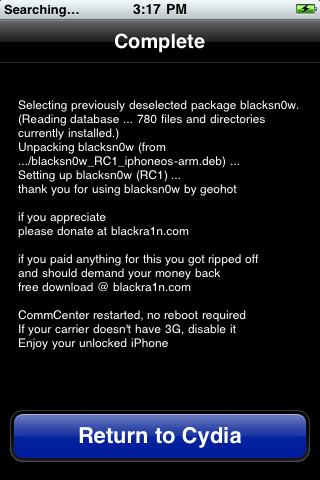
Once the unlock has been installed successfully press the large Return to Cydia button.

Step Thirteen
Wait a few minutes for your CommCenter to restart and you will now be able to use the SIM card of your choice on your unlocked iPhone!

.....................................................................................................................................................................................................................
.....................................................................................................................................................................................................................

How to hack websites using LFI (Local File Inlcusion)

  A Directory Transversal Attack


What is root directory of web server ?

It is a specific directory on server in which the web contents are placed and can be seen by website visitors. The directories other that root may contain any sensitive data which administrator do not want visitors to see. Everything accessible by visitor on a website is  placed in root directory. The visitor can not step out of root directory.

what does ../ or ..\ (dot dot slash) mean  ?

The ..\ instructs the system to go one directory up. For example, we are at this location
C:\xx\yy\zz. On typing ..\ , we would reach at C:\xx\yy.

Again on typing
..\ , we would rech at C:\xx . 

Lets again go at locatio
n C:\xx\yy\zz. Now suppose we want to access a text file abc.txt placed in folder xx. We can type ..\..\abc.txt . Typing ..\ two times would take us two directories up (that is to directory xx) where abc.txt is placed.
Note : Its ..\ on windows and ../ on UNIX like operating syatem.
What is Directory Transversel attack?

Directory Traversal is an HTTP exploit which allows attackers to access restricted directories and execute commands outside of the web server's root directory.

The goal of this attack is  to access sensitive files placed on web server by stepping out of the root directory using dot dot slash .

The following example will make clear everything

Visit this website vulnerable to directory transversal attack

http://www.chitkara.edu.in/chitkara/chitkarauniversity.php?page=notification.php

This webserver is running on UNIX like operating system. There is a directory 'etc' on unix/linux which contains configration files of programs that run on system. Some of the files are passwd,shadow,profile,sbin  placed in 'etc' directory.

The file
etc/passwd contain the login names of users and even passwords too.

Lets try to access this file on webserver by stepping out of the root directory. Carefully See the position of directories placed on the webserver.


We do not know the actual names and contents of directories except 'etc' which is default name , So I have
marked them as A,B,C,E or whatever.

We are in directory in F accessing the webpages of website.


Lets type this in URL field and press enter

http://www.chitkara.edu.in/chitkara/chitkarauniversity.php?page=etc/passwd

This will search the directory 'etc' in F. But obviously, there is nothing like this in F, so it will return nothing
Now type
http://www.chitkara.edu.in/chitkara/chitkarauniversity.php?page=../etc/passwd
Now this will step up one directory (to directory E ) and look for 'etc' but again it will return nothing.
Now type

http://www.chitkara.edu.in/chitkara/chitkarauniversity.php?page=../../etc/passwd

Now this will step up two directories (to directory D ) and look for 'etc' but again it will return nothing.

So by proceeding like this, we we go for this URL

http://www.chitkara.edu.in/chitkara/chitkarauniversity.php?page=../../../../../etc/passwd

It takes us 5 directories up to the main drive and then to '
etc' directory and show us contents of 'passwd' file.
To understand the contents of 'passwd' file, visit http://www.cyberciti.biz/faq/understanding-etcpasswd-file-format


You can also view
etc/profile ,etc/services and many others files like backup files which may contain sensitive data. Some files like etc/shadow may be not be accessible because they are accesible only by privileged users.
Note- If proc/self/environ would be accessible, you might upload a shell on server which is called as Local File Inclusion.
Counter Measures
1. Use the latest web server software 2. Effectively filter the user's input
................................................................. .....................................................................................................................................................

Hacking into NetBIOS


NetBIOS Hacking
-What is it?-
Net BIOS Hacking is the art of hacking into someone else’s computer through your computer. Net BIOS stands for “Network Basic Input Output System.” It is a way for a LAN or WAN to share folders, files, drives, and printers.

-How can this be of use to me?-
Most people don’t even know, but when they’re on a LAN or WAN they could possibly have their entire hard drive shared and not even know. So if we can find a way into the network, their computer is at our disposal.

-What do I need?-
Windows OS
Cain and Abel (http://www.oxid.it/)
++++++++++++++++++++++++++++++++++++++++++++++++++ ++++++++++++++++++++++++++++++++++++++++++++++++++ ++++++++
-[Step 1, Finding the target.]-
++++++++++++++++++++++++++++++++++++++++++++++++++ ++++++++++++++++++++++++++++++++++++++++++++++++++ ++++++++
So first off we need to find a computer or the computer to hack into. So if your plugged in to the LAN, or connected to the WAN, you can begin. Open up Cain and Abel. This program has a built in sniffer feature. A sniffer looks for all IP addresses in the local subnet. Once you have opened up the program click on the sniffer tab, click the Start/Stop sniffer, and then click the blue cross

Another window will pop up, make sure “All host in my subnet” is selected, and then click ok.

It should begin to scan

Then IP’s, computer names, and mac addresses will show up.
Now remember the IP address of the computer you are going to be breaking into.
If you can’t tell whether the IP address is a computer, router, modem, etc, that’s ok.
During the next step we will begin our trial and error.

++++++++++++++++++++++++++++++++++++++++++++++++++ ++++++++++++++++++++++++++++++++++++++++++++++++++ ++++++++
-[Part 2, Trial and Error]-
++++++++++++++++++++++++++++++++++++++++++++++++++ ++++++++++++++++++++++++++++++++++++++++++++++++++ ++++++++

Now, we don’t know if we have our designated target, or if we have a computer or printer, or whatever else is on the LAN or WAN.
If you did get the IP of the target though, I still recommend reading through this section, for it could be helpful later on.
Click on the start menu and go to run, type in cmd, and click ok.
This should bring up the command prompt.
From here we will do most of the hacking.
Now I will be referring to certain commands that need to be inputted into the command prompt.
I will put these commands in quotes, but do not put the quotes in the code when you type it into the prompt.
I am only doing this to avoid confusion.
Let’s get back to the hacking.
Type in “ping (IP address of the target).” For example in this tutorial, “ping 192.168.1.103.”
This will tell us if the target is online.
If it worked, it will look something like this (note, I have colored out private information):

If the target is not online, either switch to a different target, or try another time. If the target is online, then we can proceed.

++++++++++++++++++++++++++++++++++++++++++++++++++ ++++++++++++++++++++++++++++++++++++++++++++++++++ ++++++++
-[Part 3, Gathering the Information.]-
++++++++++++++++++++++++++++++++++++++++++++++++++ ++++++++++++++++++++++++++++++++++++++++++++++++++ ++++++++

Now, input this command “nbtstat –a (IP address of target).” An example would be “nbtstat –a 192.168.1.103.”


This will show us if there is file sharing enabled, and if there is, it will give us the: currently logged on user, workgroup, and computer name.

Ok, you’re probably wondering, “What does all this mean to me?” Well, this is actually very important, without this, the hack would not work. So, let me break it down from the top to bottom. I will just give the first line of information, and then explain the paragraph that follows it.

The information right below the original command says: “Local Area Connection,” this information tells us about our connection through the LAN, and in my case, I am not connected through LAN, so the host is not found, and there is no IP.

The information right below the “Local Area Connection,” is “Wireless Network Connection 2:” It gives us information about the connection to the target through WAN. In my case I am connected through the WAN, so it was able to find the Node IpAddress. The Node IpAddress is the local area IP of the computer you are going to break into.

The NetBIOS Remote Machine Name Table, give us the workgroup of our computer, tells us if it is shared, and gives us the computer name. Sometimes it will even give us the currently logged on user, but in my case, it didn’t. BATGIRL is the name of the computer I am trying to connect to. If you look to the right you should see a <20>. This means that file sharing is enabled on BATGIRL. If there was not a <20> to the right of the Name, then you have reached a dead end and need to go find another IP, or quit for now. Below BATGIRL is the computers workgroup, SUPERHEROES. If you are confused about which one is the workgroup, and the computer, look under the Type category to the right of the < > for every Name. If it says UNIQUE, it is one system, such as a printer or computer. If it is GROUP, then it is the workgroup

++++++++++++++++++++++++++++++++++++++++++++++++++ ++++++++++++++++++++++++++++++++++++++++++++++++++ ++++++++
-[Step 4, Breaking In]-
++++++++++++++++++++++++++++++++++++++++++++++++++ ++++++++++++++++++++++++++++++++++++++++++++++++++ ++++++++

Finally it’s time.
By now we know: that our target is online, our target has file sharing, and our target’s computer name.
So it’s time to break in.
We will now locate the shared drives, folders, files, or printers. Type in “net view \\(IP Address of Target)”
An example for this tutorial would be: “net view \\192.168.1.103”

We have our just found our share name. In this case, under the share name is “C,” meaning that the only shared thing on the computer is C. Then to the right, under Type, it says “Disk.” This means that it is the actual C DISK of the computer. The C DISK can sometimes be an entire person’s hard drive.

All's that is left to do is “map” the shared drive onto our computer. This means that we will make a drive on our computer, and all the contents of the targets computer can be accessed through our created network drive. Type in “net use K: \\(IP Address of Target)\(Shared Drive). For my example in this tutorial, “net use K: \\192.168.1.103\C.” Ok, let’s say that you plan on doing this again to a different person, do u see the “K after “net use?” This is the letter of the drive that you are making on your computer. It can be any letter you wish, as long as the same letter is not in use by your computer. So it could be “net use G...,” for a different

As you can see, for my hack I have already used “K,” so I used “G” instead.
You may also do the same for multiple hacks.
If it worked, it will say “The command completed successfully.”
If not, you will have to go retrace you steps.
Now open up “my computer” under the start menu, and your newly created network drive should be there.

Now, if you disconnect from the WAN or LAN, you will not be able to access this drive, hence the name Network Drive.
The drive will not be deleted after you disconnect though, but you won’t be able to access it until you reconnect to the network.
So if you are doing this for the content of the drive, I recommend dragging the files and folders inside of the drive onto your computer,
because you never know if the target changes the sharing setting.
If you are just doing this to hack something, then go explore it and have some well deserved fun!

Congratulations! You’re DONE!

-Commands used in this tutorial:
PING
NBTSTAT -a (IP Address of Target)
NET VIEW \\(IP Address of Target)
NET USE K: \\(IP Address of Target)\(SHARENAME)
..................... ................................................................................................................

Phisher Program Reversed

Step 1 -Head to http://reflector.red-gate.com/Download.aspx and download .NET reflector
Step 2 - Run .NET reflector


.NET reflector


Step 3 - Download the phisher you want to reverse
Step 4 - Go into your Downloads folder and grab your phisher into .NET Reflector


.NET reflector


Step 5 - expand your phisher

.NET reflector


Step 6 - Open the one that is the name of the file, not the ".MY", ".MY.RESOURCES", or "-" or "references"

.NET reflector


Step 7 - Theirs usually a form1, expand it

.NET reflector


Step 8 - Look for button1_click, or something very similar, it's usually near the top, right click it and click 
"Disassemble"

.NET reflector


Step 9 - Now look for Network credentials, and you have the email info

.NET reflector


Step 10 - Go to the email, check the inbox


[How to find phishers on youtube]

What to search for

MapleStory:

Meso Generator

NX Generator

Rapidshare:
Point Generator

XBL:

Xboxlive generator
Points Generator

RuneScape:

Item generator
Gold Generator
Skill Changer

Related Posts Plugin for WordPress, Blogger...
Twitter Delicious Facebook Digg Stumbleupon Favorites More